4 Things you should do when you move into a New Home

4 Things you should do when you move into a New Home

4 Things you should do when you move into a New Home

A Little Housekeeping:

The Essential Stuff You Should Know

This may not be what you first think of when you move into a new home, but it could save you alot of money. Think of this as a “getting to know your home” exercise.

These are essental checks thatyou should make in your New Home.  They could save you money and might even save your life. They will definitely stop a plumber from giving you that pitying look when you’re not sure where the water turns off.

Step 1: Stick the Kettle on

We all know nothing productive happens without a cuppa first. So, brew up and let’s crack on.

Step 2: Get Familiar with your Electricity Supply

You might think you know where the Consumer Unit (fuse box, for us mere mortals) is, but let’s be sure, shall we? Now, ask yourself these important questions:

Can I turn it off quickly if I need to?

Go on, try switching it off and back on again. If it’s buried at the back of a cupboard, do yourself a favour and keep the path clear – no one wants to dig through old paint cans or a mountain of camping gear in an emergency. Also, maybe avoid storing anything flammable in there? Just a thought.

Is it properly labelled?

Can you clearly tell which switch controls what, or does it feel more like a raffle? If it’s the latter, sorting that out should be a priority. If you’re not sure how to do this, check out our post on Consumer Units

Do you have an RCD?

If you’ve no idea what that is, have a look at Electrical Safety First, who explain what they are, and why they are an extremely good thing to have. It’s important.

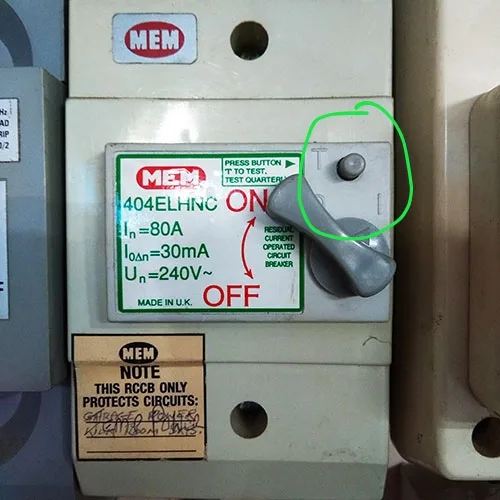
If you do have one, test it! Press the “T” or “Test” Button and make sure it’s still doing its job. A little maintenance never hurts.

What type of Consumer Unit do you have?

This probably seems a bit of strange question, but its good to know the answer. You may have listened to your Solicitor’s advice and had an electrical survey carried out as part of the buying process. If you did, you should know a bit more about this, and should have a certificate to refer to. If you’re not sure what the certificate actually tells you, go back to the electrician who carried out the inspection for you. They can explain. Failing that, you can always contact us, and we can explain it to you. 

If you didn’t have an electrical inspection, check out our post on Consumer Units – Know your Stuff. There’s a bit of useful information there, explaining what you’e looking. 

Look for a Smoke & Heat Detectors

Hopefully your new Home has Smoke and Heat Detectors installed. If they do, please give them a quick Test, by pressing the TEST button. Check the Expiry date while you’re there.

If you can’t find any Smoke/Heat Detectors, or they are past their expiry date, please make getting new ones installed a priority.

Check out our post on Smoke Detector Safety, if you need more information

And lastly……..Take a Meter Reading

You don’t want to be paying for the last occupants’ Electricity, so take a Meter reading and submit it to your supplier. Ideally, take a photo of the reading, so that you have a Time & Date Stamp to refer back to.

Step 3: Discover where your Water Supply turns off

You’d be surprised how many people have no clue how to turn off their water. In fact, a lot of people who come on our DIY courses haven’t a clue either. I get it – it’s not something you think about until water’s gushing from somewhere it really shouldn’t be. But trust me, you don’t want to be on a frantic treasure hunt while the insurance claim’s ticking up.

1. Start Outside – Look for the Pavement cover

You’ll likely find a small cover near your front gate – that’s where the external stopcock hides. If you live in a flat, identifying which one’s yours can be a bit of a guessing game. Turning them off one by one works, but it might lead to some awkward neighbourly encounters (especially if they’re mid-shower).

It should look something like this. It might even have “Water” written on it:
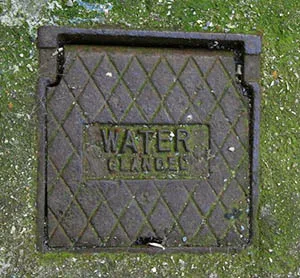
Old Style External Stop Tap

Old Style Metal Cover

Use a Flathead Screwdriver to flip the Top up
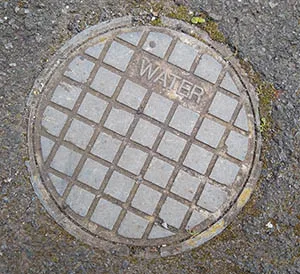
Modern Plastic Cover

Use a Flathead Screwdriver to flip the Cover up

Turn-style External Stop Tap Cover

Annoying "Turn" Cover

Don’t be fooled. This Cover turns anti-clockwise to open. Badly thought-out design, which isn’t installed any longer. Try twisting it, it might come up. If not contact your Water Supplier and get them to replace it.
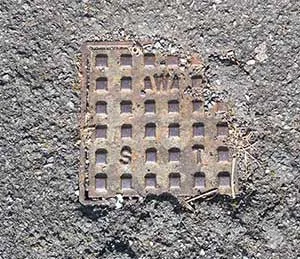
External Stop Cover Stuck Down

Metal Cover Stuck Down

Not uncommon if the Pavement has been resurfaced. Get it unstuck now, before you have an emergency, and can’t get the cover up.

Take a Meter Reading

If you find it, and it has a meter, take a meter reading. Again, I would take a photo, just for posterity.

Its also worth double-checking that it doesn’t keep running when you’ve turned the supply off. If it does, then you may be paying for someone else’s supply. Rare, but not impossible

2. Check Indoors

The usual suspects are under the kitchen sink or in a utility room, but I’ve come across them in all sorts of weird places – under floorboards, hidden in random cupboards. Start with the obvious and work your way to the downright bizarre.

Check out our other post on Finding Your Stop Tap

3. Still Can’t Find It?

Ask your new neighbours – they might have the same setup and could save you some time. If that doesn’t work, contact your water supplier – they might have a record of it. If you’re still out of luck, put it on your to-do list and get a plumber involved. They can install one in a more sensible spot.

Step 4: Gas or Oil - Find the OFF Switch

Mains Gas

Your gas meter will likely be near the front of the house, possibly in a little box outside. Make sure you can turn it off without too much faff. If it’s locked up, get yourself a meter box key – they’re cheap as chips at your local hardware store.

LPG or Oil

These tanks aren’t exactly discreet – you’ve probably tripped over them a few times already. Just double-check you know where the shut-off valve is, and maybe have a quick peek at security while you’re at it – oil theft’s a thing in the countryside.

Look for a Carbon Monoxide Detector

If you have a Gas or solid-fuel Boiler, or a multi-fuel stove, you also need to have a Carbon-Monoxide Detector.

If you can’t find one in your new home, please pop down to the nearest DIY/Hardware store/Supermarket & buy one NOW.

You may have no idea when the last service was carried out on these appliances. 

You don’t want your first night in your new home to be your last. I know that sounds dramatic, but Carbon Monoxide is invisible. It doesn’t smell, and it can kill you very quickly. 

Give yourself a Round of Applause

You’ve just ticked off three essential checks that most people ignore until disaster strikes. Sure, dealing with a crisis is a crash course in home maintenance, but wouldn’t you rather be prepared than panicked?

If you’re renting, your landlord really should have told you all this. If they didn’t, maybe give them a gentle nudge – it’s in their best interests too, after all!
Where do I Turn my Water off?

Where do I Turn my Water off?

Where do I Turn my Water off?

Do you know where to turn off your water?

We have lost count of the number of houses we have been to where the customer has no idea how to turn their water off in an emergency. This is one of those life skills that is much easier to learn before you actually need it.

Meeting your Stop Tap for the first time, while water is pouring out of a broken pipe, can often feel quite stressful.

If you do know exactly where your stop tap is, can you turn it on and off easily?

In fact, we recommend that you start a routine of checking regularly, just in case. Check out our post on Regular Home Maintenance. 

If you regularly practice for just such a scenario, give yourself a congratulatory pat on the back and move onto another topic.

If you’re not sure, or only have a vague idea, it might be worth reading a little bit further.

External Stop Taps

If you’re lucky, you may be able to turn your water off in the street outside your house. There will be a little metal or plastic manhole cover on the pavement looking much like this. There is a often a clue stamped on the top. (If the word “GAS” is stamped on the top, you are not looking at your Water Stop tap):

Old Style External Stop Tap

Old Style Metal Cover

Modern Plastic Cover

You may need a flat-headed screwdriver or other improvised tool to prise the top up. (Its quite common for the top to have been glued down during a pavement resurfacing. You don’t want to find this out in an emergency).

Very occasionally, you may come across a style which turns, rather than lifts. If attempts to prise the lid off fail, you may have one of these. They can be a bit awkward to get the lid off, and thankfully, they don’t seem to be installed these days. Just try twisting the lid, anti-cllockwise (in the direction you would turn a tap on), using the blade of the screwdriver, and hopefully it will move.

Once you have the lid off, you will see either an old style brass tap, or a newer plastic tap. If you’re unlucky, the Brass Tap may have seized up and won’t move. Sometimes it helps to try to open the tap rather than turn it off. This allows it to move, and then you can close it.

If you have a plastic tap, there should be a plastic key to operate it, under the lid. If you can’t see one, open up one of your neighbours’ Stop Tap covers and borrow theirs. (That maybe why you don’t have one). For some reason, the plastic taps are often quite hard to turn off completely. It might feel that you’re about to break the plastic key before it actually stops the final dribble.

Old External Brass Stop Tap

Brass Tap Style Stop Tap

Not much chance of getting this old Stop Tap to move. Give it a go, with some WD40, but this maybe a call to Bristol Water

New Style External Stop Tap

Modern Stop Tap Style

This should just need a quarter-turn using the Blue Handle.

Please note, the handle will come off in your hand. Don’t panic!

External Stop Tap Key

Stop Tap Plastic Key

You will need this to turn your water off. It should be with your Stop Tap. If you can’t see it, check one of your neighbour’s Stop Taps, and borrow theirs.

External Stop tap with Meter

External Stop Tap with Meter

You may already have a  a meter. In which case turning off your water supply should be a doddle

If the stop tap is a long way down, you may need a Stopcock Key to turn off your water.  That’s something else you may not be able to get hold of in a hurry.

TOP TIP

If your Water Stop Tap is an old BRASS TAP,  open the tap fully, when you turn the water back on. Then turn the tap  back a ¼ Turn.

This will give you some Wriggle room if your Stop Tap starts to seize up in the future.

At this point, you should give yourself a pat on the back.

  • If you’re in the middle of an emergency, you have prevented any more damage being caused.
  • If you’re being proactive and preparing yourself for an emergency situation, you now know that your External Stop tap does (or doesn’t) turn off.

Your local Water supplier is responsible for the External Stop Tap. If it isn’t working, or is leaking, it is their responsibility to come out and repair it. Bristol Water have some useful information on their site about what do in this eventuality.

Internal Stop Taps

Some people have some idea about where their Stop Tap is inside their house.

A good place to start looking is under the Kitchen Sink. Usually, in my experience, this means pulling out an odd assortment of cleaning products, congealed packets of washing powder and cleaning cloths in order to actually reach it. However, when you get there, it may look like this:

Stop Tap under Kitchen Sink

If it isn’t there, these are some of the other places worth looking:

    • Just inside your front door – how lucky you are – in a box marked “Water Stop Tap” – Ok, we can all dream.
    • Maybe in an outhouse, the old lean-to toilet in the back garden, in the garage…..
    • Under the floorboards – I’m not joking. I have found many stop taps hidden away under the floor – what were they thinking? Wobbly floorboards, not screwed down can be a bit of a giveaway for this particular scenario. (Our original Stop Tap was just out of reach if you took up the loose floorboards in the porch, laid on your front and stretched as far as possible. I can only assume they sent small children down there in the old days.)
    Internal Stop Tap coming up out of a solid floor

    Internal Stop Tap Above Ground

    This horrible looking Stop Tap is coming up out of a solid floor.

    Internal Stop Tap Hidden Under Floorboards

    Stop Tap Hidden Under Floor

    This is more common thn you would think. I find this most often in old Edwardian/Victorian Terraced Houses.

    You’re not going to get to this in a hurry

    If it isn’t in one of these places, then you can assume that either you don’t have one (not unusual), or that you may have one in an obscure position which nobody has know about for decades. If that is the case,  even if yo do find it, the chances of it still being able to turn are pretty obscure.

    TOP TIP

    At the next available opportunity, employ a Plumber to install an internal Stop tap for you in a sensible, accessible position.

    Do I need an Internal Stop-tap?

    In a word, no. There is no requirement for you to have an internal stop tap. If your external stop tap works well and is easily accessible, then you may not need to have one.

    In the event of an emergency, for instance a plumbing fitting failing in the first floor bathroom,  the time it takes for you to run down the stairs, find a flat-headed implement (to prise off the cover), locate a headtorch, put your slippers on and get out to the external stop tap, several litres of water may have flooded through your Kitchen ceiling (and light fittings).

    There are alternatives to the traditional Tap-like Stop-tap, which can be awkward and stiff to use. They require a degree of force and dexterity, and as we have discussed can be in inaccessible places.

    One option is a Lever-style tap, such as this. They have a very definite action, are easy to operate and are less likely to seize up.

      Lever Style Stop Tap - Open

      Lever Stop Tap (Open)

      Lever Style Stop Tap - Closed

      Lever Stop Tap (Closed)

      Another alternative is the Surestop Stoptap. This can be installed at a distance from the pipework. It is operated by what looks like a large Lightswitch. It employs a pressure switch, which means there is a very slight delay between pressing the switch, and the water flow stopping, but is still very quick and is extremely easy to operate.

        Surestop Stop Tap

        It is recommended that this is installed as an additional means of isolating the water supply, so it is ideal if you have an external Stop-tap. It really should not be your only means of turning off the supply.

          Whether you decide to have an internal stop-tap installed, or rely on an external stop-tap, we strongly urge you to go and check that one or other, or (in a perfect world, both of them) work and that you know how to access and operate them in a hurry.

          Please don’t wait until you need to do this in an emergency.

          Keep your Home ticking over

          Keep your Home ticking over

          Keep your Home ticking over

          Top Tips to help you keep your Home Safe.

          Follow this simple guide for some essential  Proactive Home Maintenance on the weekends that the Clocks change. Its a great time to carry out these simple jobs to keep your home safe.

          Nothing too strenuous. You probably won’t even need any tools. Just a few checks which could save you a bit of money, and possibly, even your life.

          I’m recommending that you carry out the following FOUR checks:

          The reason I suggest this weekend, is because the clocks change.

          It happens twice a year, which is the perfect interval for carrying out these checks. 

          On Sunday morning, you’re going to be scratching your head, trying to remember how to reset the clock on the Microwave and the Oven.

          (How many of us give up with clock in the car, and decide that living 6 months in the future is infinitely preferable to wading through a huge car manual trying to find the tiny paragraph dedicated to the overly complicated clock setting?)

          Anyway, I’m not really worried about the car. Its your Home, and in fact, you & your family,  that matters this weekend. Keeping your Home safe is simple, and quick. Let me explain…..

          Give your RCDs a bit of exercise

          The clocks going back (or forwards in March) is the trigger.  It happens twice a year, and that’s the recommended interval for exercising your RCDs.

          PLEASE DO THIS TEST BEFORE YOU CHANGE THE TIME ON ALL YOUR CLOCKS

          Who knew an RCD needed exercise?

          Ok, I’m sure some of you are also asking what one of those is. If you’ve never heard of them, then please check out our useful post on Tripping RCDs.

          You can find out what they do, why they’re not only a good idea, but actually essential for keeping you safe. You’ll even learn what to do if they start tripping.

          All you need to do, is press the little TEST or  (T) button on the RCD, and it will switch off. (The lever will drop down) This will turn off the power to a number of circuits.

          Just reset the RCD by pushing the lever back up (Some Consumer Units need you to push the lever down a bit further, before you push it up).

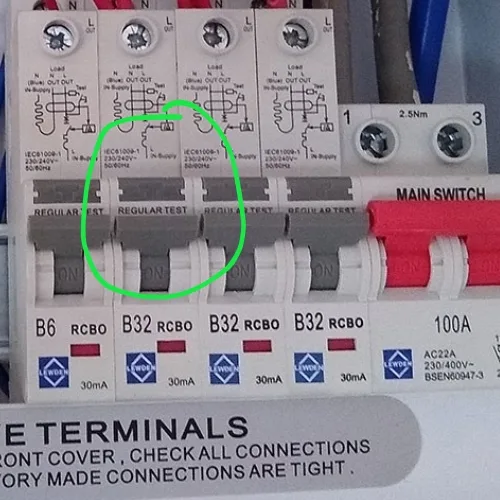
          Some of you may have a nice modern Consumer Unit, where each circuit is protected by its own RCD. These are called RCBOs. The same principle for these. Just press the TEST button, turn the circuit off, and then turn it back on.

          That’s all you need to do.

          Old Style RCCB with Test Button
          Old Style RCCB

          Press the button. Turn the lever back up to reset.

          RCD with Test Button
          RCD

          Press the black button. The lever will drop. Press the level back up to reset.

          RCCB Test Button
          RCCB

          Press the black “T” button. The lever will drop. Press the level back up to reset.

          RCBO with Test Button
          Newer RCBO

          Press the GREY Test button. The lever will drop. Press the level back up to reset.

          Why am I asking you to do this?

          RCDs (or RCBOs) constantly monitor your electrical installation. Their job is to switch everything off in the event of a fault. You need them to be in tip top condition, so that they do this as quickly as possible, and save your life.

          What if my RCD won’t switch off?

          If this happens, then your RCD is not doing its job properly. It proves how important it is to carry out this test.

          I recommend that you contact an Electrician on Monday, and arrange for them to come and check it out for you.

          Check your Heat & Smoke Detectors

          Smoke Detector Expiry Date

          I know we only think about these when the annoying chirping starts as the battery starts to fail. That generally happens in the winter, when the temperature drops in the middle of the night. Batteries struggle more in the cold weather.

           Just press the Test Button on your Smoke Detector, and make sure that it goes off. If you have inter-connected Smoke Detectors, this should also set all the other Smoke Detectors of in the House.

          While you’re up the ladder, just check the Expiry Date on the Smoke Detector. If it’s already long past. You need to replace them.

          This is something you can probably do yourself. Check out our post on Smoke Detectors.

          If your Smoke Detector is quite elderly, check our Safelincs Website, where you can find a list of compatible Smoke Detectors.

          If you’re not sure, then call an electrician.

          Check your Water Supply

          Hopefully you know where your mains water supply turns off.

          If you don’t, you’re not alone. However, you’re about to rectify that situation.

          Check out our post, “How do I turn my water supply off?

          Why am I asking you to do this?

          If you have a sudden plumbing emergency, then knowing where your Stop Tap is, that it’s accessible and that it turns off is going to save you loads of money.

          Over time, Stop Taps can seize up. You really don’t want to find that yours has done that, when there is water pouring out of something that shouldn’t be.

          Take it from me, there is nothing like the sound of gushing water to stop your brain thinking clearly.

           If you discover that the only way to turn your water supply off is outside on the pavement, you’re going to make sure that you have something helpful to lever the cover off the water stop tap easily accessible for future use.

          If you come on our Essential Home Plumbing Course, we talk a lot about making sure you’re prepared for these eventualities.

          Water damage is potentially very expensive. Insurance Companies really don’t like it.

          So…..

          TOP TIP

          If your Water Stop Tap is an old BRASS TAP,  open the tap fully, when you turn the water back on. Then turn the tap  back a ¼ Turn.

          This will give you some Wriggle room if your Stop Tap starts to seize up in the future.

          If you’re in Bristol, and you’re struggling to turn your Stop Tap off, check out Bristol Water’s Website. They have lots of helpful information and support.

          If you live outside Bristol, check out your own Water Supplier. If you’re lucky they might be one the helpfl ones 

           And finally……

          Check your Carbon Monoxide Detector

          This is, sadly, a very timely reminder of just how important these are.

          You can’t see or smell Carbon Monoxide. It will kill you very quickly.

          If you have a Gas or Oil Boiler, or a Solid Fuel stove, then you should have a working Carbon Monoxide Detector somewhere near by. Often this is just “hanging about nearby” and not actually fixed down. In this case it can be easily mislaid. Make sure that it is not under a pile of magazines, or under the sofa. Its not going to work properly there

          Please check that it works and that it is in date.

          If you can’t find one, please go and buy yourself one AS SOON AS POSSIBLE.

          You can buy a battery-operated Carbon-Monoxide Detector from any local DIY/hardware Store, or Supermarket.

           No excuses on this one. Please do it. It will save your life!

          If you don’t have a Carbon-monoxide Detector,  that suggests that you may not have had your had your boiler serviced recently.

          A Gas or Oil Engineer will check that you have one when they service your Boiler, and persuade you to get one.

          Please get your boiler serviced every year. It will save your life

          That’s it. You’re done. You have kept your Home, yourself and your family safe for the next six months

          If you’re a parent, maybe this is a good exercise to involve your children in. The more peple who now to deal with an emergency, the better. 

          How do I cut Copper & Plastic Pipe?

          How do I cut Copper & Plastic Pipe?

          How do I cut Copper & Plastic Pipe?

          Cutting Copper & Plastic Pipe

          How do I cut copper pipe? is a question we are asked early on in our DIY Plumbing Courses

          As those of you who have been on our Essential Home Plumbing Course will know, cutting copper & plastic pipe is pretty straightforward, once you know the technique.

          We thought it would help to make a quick video to remind you of a couple of important tips whencutting pipe, and the differnt tools you can use.

          If you still feel a bit wary about doing this, or would like a bit more practice, why not sign up for one of our DIY Plumbing Courses, or check out our DIY Assist Service (we come to your home and support you with your DIY projects)

          Using Compression Joints

          Compression Plumbing Fittings

          As those of you who have been on our Essential Home Plumbing Course will know, Compression fittings can be a joy to use

          They are great for DIY plumbing. We thought it would help to make a quick video to remind you of a couple of important tips when using the fittings.

          If you still feel a bit wary about using them, or would like a bit more practice, why not sign up for one of our DIY Plumbing Courses, or check out our DIY Assist Service (we come to your home and support you with your DIY projects)

          Using Push-fit Fittings

          Using Push-fit Fittings

          Using Push-fit Fittings

          Speedfit Pushfit Plumbing Fittings

          Learning to use Pushfit Plumbing Fittings is easier than you think. As those of you who have been on our Home Confidence 1  – Understanding Plumbing Course will know, these JG Speedfit Push-fit Plumbing fittings are really straightforward to use.

          They are great for DIY plumbing. We thought it would help to make a quick video to remind you of a couple of important tips when using the fittings.

          If you still feel a bit wary about using push-fit fittings, or would like a bit more practice, why not sign up for one of our DIY Plumbing Courses, or check out our DIY Assist Service (we come to your home and support you with your DIY projects)

          Frozen Boiler Condensate Pipes

          Frozen Boiler Condensate Pipes

          Frozen Boiler Condensate Pipes

          Why Boiler Condensate Pipes Freeze

          Winter can be a magical time, but it also brings its own set of challenges, especially for homeowners. One common issue that many face is the freezing of boiler condensate pipes. But why does this happen, and what can you do to prevent it? Let’s explore.

          Understanding the Problem

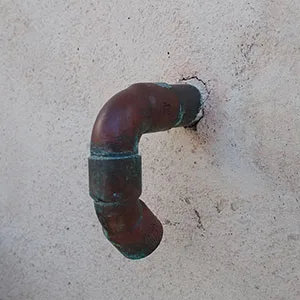
          Boiler condensate pipes are responsible for carrying away the acidic water produced during the heating process. These pipes are usually located outside, making them susceptible to freezing temperatures. When the water inside these pipes freezes, it can cause a blockage, leading to a boiler shutdown. Not exactly what you want on a cold winter’s day!

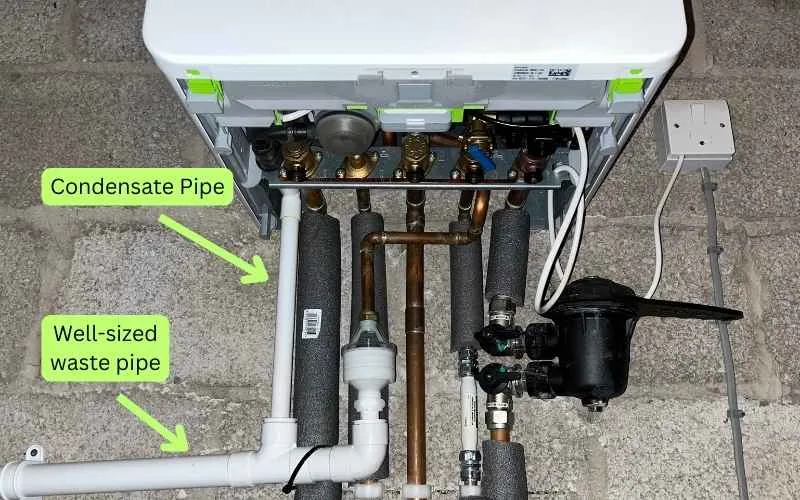
          Boiler Condensate Pipe Layout

          The diameter of the condensate pipe is quite small, so much more susceptible to freezing. If it runs into a large pipe (as above), before it goes outdoors, it is much less likely to freeze. 

          How can you prevent it?

          1. Insulation is Key: The simplest way to prevent freezing is to insulate your condensate pipes. Use foam pipe insulation to wrap around the pipes, providing a protective layer against the cold.

          2. Increase Pipe Diameter: If possible, consider increasing the diameter of your condensate pipe. A wider pipe is less likely to freeze as it allows water to flow more freely.

          3. Check that it runs Downhill: Very often a poorly installed condensate pipe won’t flow downhill. Water can get stuck in bends, making it much more likely to freeze. Make sure that the condensate pipe is properly supported, and not running uphill or sagging.
          4. Shorten the External Run: Try to minimize the length of the pipe that runs outside. The less exposure to the cold, the better.

          5. Install a Trace Heater: A trace heater is an electrical device that wraps around the pipe and keeps it warm. It’s a more advanced solution but highly effective.

          Dealing with a Frozen Condensate Pipe

          If your condensate pipe has already frozen, don’t panic. Here’s what you can do:

          1. Thaw the Pipe: Use a hot water bottle,  a warm cloth, or a gentle hairdryer to gently thaw the pipe. Avoid using boiling water as it can cause damage.

          2. Check for Blockages: Once thawed, check for any blockages and clear them if necessary.

          3. Reset the Boiler: After ensuring the pipe is clear, reset your boiler. This should get it back up and running.

          4. Call a Professional: If you’re unsure or the problem persists, it’s always best to call in a professional to take a look.

          Final Thoughts

          Preventing your boiler condensate pipe from freezing is all about preparation. By taking a few simple steps, you can ensure your home stays warm and cozy all winter long. And if the worst does happen, you’ll know exactly what to do to get things back on track.

          How to re-pressurise a Boiler

          How to re-pressurise a Boiler

          How to re-pressurise a Boiler

          How do I know my Boiler needs re-pressurising?

          Learning to re-pressurise your boiler is a straighforward task. In most cases, you will suddenly discover that you have no hot water or heating, and your boiler is not working.

          There are many things that cause a Boiler to stop working. Many of them will require an engineer to come out and repair the fault. However, by far the most common issue to stop a boiler working is a drop in boiler pressure. This is something that you can rectify yourself. (If there has been a suddent drop in temperature outside and the weather is freezing, check out our advice on Freezing Condensate Pipes as well)

          In fact the pressure on your boiler is something that you really should be aware of and check on a regular basis. If the pressure is constantly dropping and you are regularly having to re-pressurise your boiler, that indicates that there is an underlying problem, possibly a leak somewhere in the system, and you should call in a Gas-Safe Engineer to investigate and rectify the problem.

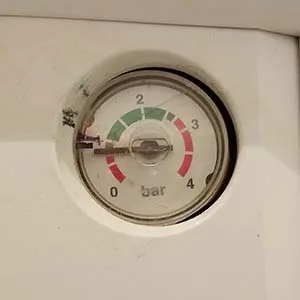
          Most Boilers have some kind of pressure gauge on them, which gives you an indication of the boiler pressure.

          If the Pressure Gauge is a dial, there is usually a helpful Green section which indicates a safe operating pressure, and a  Red section, which indicates that the pressure is too high or too low.

          They also often have some lines, to indicate a normal pressure. The needle should be slightly above this normal level, or, on some dials, between 1 & 2.

          If the needle has fallen below 1, (or the line),  then the boiler pressure is too low and needs to be increased.

          If the needle is in the high Red section, your pressure is too high. The boiler should rectify this problem itself by dumping (usually very hot) water out of the system through a Pressure Relief Valve. You may see this happening on an outside wall of your house. If this does happen, turn the boiler off and call an engineer.

          To relieve the pressure, try bleeding your radiators to release some air. The system may just have trapped air in it, which needs to be removed from the system. The air is most likely to be in the highest radiator, so start there. 

          How do I re-pressurise my Boiler?

          If you’re lucky (organised) enough to still have the manual that came with your boiler, the instructions will be found there.

          Failing that, there is a lot of information on the web to help with re-pressurising your boiler. Each make (and sometimes model) of boiler is different, so it is not possible to give a one-size-fits-all explanation.